Introduction
Free Browsing Tricks (FBT) is known all over the internet and on forums. It is helpful to others, especially those who don't have money to avail plan, in accessing internet.
What is Psiphon 3?
Psiphon 3 is a circumvention tool from Psiphon Inc. that utilizes VPN, SSH and HTTP Proxy technology to provide you with uncensored access to Internet content. Your Psiphon 3 client will automatically learn about new access points to maximize your chances of bypassing censorship.
Psiphon 3 is designed to provide you with open access to online content. Psiphon does not increase your online privacy, and should not be considered or used as an online security tool.
How to use Psiphon 3 for free internet use?
First, you need to download the softwares below
Psiphon 3 download link (Windows)
Psiphon 3 download link (Android)
What SIM do we need to use?
SmartBroadband for Visayas and Mindanao
Globe/TM for all over Philippines
How do we connect it?
Plug in your broadband with SIM
Connect to dashboard
Open the Psiphon3
Wait until it connects
Congratulation! You now have unlimited internet with Psiphon3!
PROs
Connect anytime you want
Easy to connect
Random Server
Privacy
Good for downloading and browsing purposes
CONs
Some ports cannot be access
Applications (example: Skype, Online games) can't connect to their servers because of port exclusion
Filipino Library( all about Movies,Music,Watch Online,Games,Application,Gadgets and Tips and Tricks)
Showing posts with label Tutorials. Show all posts
Saturday, August 9, 2014
Thursday, August 7, 2014
Globe Wimax Reconnection
A. alamin muna naten kung hackable ba ang wimax mo.
Globe Wimax Model na hackable:
BM622 (version 2009, 2010, 2011)
BM622i (version 2009, 2010, 2011)
BM622m (any)
BM625 (2009, 2010)
BM621 (2009, 2010)
Ganito naman para malaman ang package date mo:
1. Go to your wimax gateway. Default Gateways are:
*BM622,BM625,BM621: 192.168.1.1
*BM622i,BM622m: 192.168.254.1
2. Login ka as: username|password
*BM622 - user|user OR user|0SlO051O
*BM622i - user|user OR user|0SlO051O
*BM622m - user|0SlO051O
*BM625/BM621 - user|user
3. Makikita mo na ang iyong Package Date.
B. Enable your Computer Telnet Client and Server. Ganito yan.
1. Pumunta sa Start Menu
2. Control Panel
3. Programs
4. Programs And Features
5. Turn Windows features on or off
6. Check Telnet Client and Server
7. Press OK and at hintayin mag save.
C. Enable Wimax Modem Telnet
1. dôwnlôad this first:
BM622i 2009-2010: dôwnlôad Here (wait 5 seconds then skip ad)
BM622 2009-2010: dôwnlôad Here (wait 5 seconds then skip ad)
BM622 2011: dôwnlôad Here (wait 5 seconds then skip ad) credits kay heartilly
2. Login ka as user tapos copy mo WAN MAC mo.
3. For BM622 2009-2010 and BM622i 2009-2010, open mo ung dinownload mo knina na passgenerator. Paste mo WAN MAC mo dun.
4. Login kana as admin and paste the generated password.
5. For BM622 2009-2010, go to advance, ACL, check LAN Telnet, APPLY!
6. For BM622i 2009-2010, go to advance, Firewall, disable firewall, APPLY!
7. For BM622 2011, dôwnlôad the admin password generator.
8. Dapat connected na ang BM622 2011 mo at accessible na ito. Irun lng ang software at pindutin ang start, wait ng konti at lalabas na ang password mo.
D. Procedures to Reconnect your wimax:
1. I-dôwnlôad ang software na angkop sa iyong modem.
Big thanks to yyyxyyyz, TheCasper, shyb0i para sa mga software na ito.
-BM622 2009 and 2010: dôwnlôad Here (wait 5 seconds then skip ad)
-BM622 2011: dôwnlôad Here (wait 5 seconds then skip ad)
-BM622i 2009 and 2010: dôwnlôad Here (wait 5 seconds then skip ad)
-BM622i 2011: dôwnlôad Here (wait 5 seconds then skip ad)
-BM622m: dôwnlôad Here (wait 5 seconds then skip ad)
-BM625 2009 and 2010: dôwnlôad Here (wait 5 seconds then skip ad)
-BM621 2009 and 2010: dôwnlôad Here (wait 5 seconds then skip ad)
2. Buksan mo lang yung software at magkabit ng working mac tapos ok.
*Kung wala kang working mac, try mong mag hanap maraming nakakalat dyan! wag po kayo matakot sa blank wan!!
3. Wait tyo hanggang magreboot ang wimax natin, at magkainternet na.
4. Tapos na! Pwede kana maginternet! :)
Monday, August 4, 2014
Thursday, July 31, 2014
MYVIEW / MOVETAB FIRMWARE
Please choose only the firmware that corresponds to your Tablet's Model.
MA700 ICS 4.0
MA700DX Jellybean 4.1
MA701QX Jellybean 4.2
MA705 ICS 4.0
MA710 ICS 4.0
MA715 Jellybean 4.1
MA900 ICS 4.0
For the Flashing procedure, click here
How to repair bm622 2009 blank wan
enable telnet
follow this
telnet 192.168.1.1
Login: wimax
PASS: wimax820
ATP> display allmacaddr
ATP> setallmacaddr "enter your Mac"
ATP> save
ATP> exit
Upload ng Fresh ADVANCE config file DOWNLOAD HERE
Run the bm622 2011 (Upgrader Tool)
Upgrade to 2011 firmware.
After Successful Upgrade
telnet 192.168.1.1
Login:Firefly
PASS: $P4mb1h1r4N4m4nT0!!
ATP> display allmacaddr
ATP> "set sërïal number command"
ATP> xiugai macdizhi "Your Mac"
ATP> diag restore default
Done! {Blank Wan Solve}
For Manual Upgrade via CMD
1. Copy the bm622firmware.bin to c:\(your firmware file location)
2. RUN cmd
3. cd "c:/" then press Enter
4. tftp –i 192.168.1.1 put bm622firmware.bin
5. wait till finish
6. done!
Seond Way on How to Fixed bm622 Blamk WAN
Huawei BM622 model is the first 4G WiMAX CPE wireless broadband modem supplied by Huawei Technologies from Shenzhen's for Globe Telecom one of the major wireless broadband ISP in the Philippines.
Recently there were so many complains from the 4G WiMAX wireless broadband subscribers that their CPE modem can't access to the internet. They have noticed upon opening the web GUI of the said 4G WiMAX CPE modem Huawe BM622 on the part of WAN interface its MAC address is missing/blank no wonder their connection interrupted or unsuccessful.
Until now there is still an issue of so called "BLANK WAN" of Huawei BM622 4G WiMAX wireless broadband CPE, to solved this problem and issue one should knows in basic electronics skill. BLANK WAN in other words WAN chips the ST Micro/SGS M25P32 sërïal flash Memory IC is corrupted this is due to malicious programming or setting done by user in wrongly manipulations.
These are the things what you need to be able to solved your Huawei BM622 BLANK WAN.
1.50pesos LPT SPI hardware programmer or USB SPI hardware programmer (DIY)
2.TV/DVD SPI Flash programmer software (d0wnl0@d)
3.ST Micro/SGS M25P32 sërïal flash Memory dump binary (ask Google/Forum/Neighbor/Friend)
The procedure to solve the BLANK WAN, first buy or do it yourself LPT SPI hardware programmer. Second is to d0wnl0@d TV/DVD SPI flash programmer, third search and d0wnl0@d BM622 WAN dump file from Google, forum, or d0wnl0@d via TFTP your neighbor/friend BM622 ST Micro/SGS M25P32 sërïal flash Memory dump binaries to your local drive.
DOWNLOAD WAN IC DIAGRAM HERE
If you have all these stuff now you can removed your Huawei BM622 WAN chips ST Micro/SGS M25P32 sërïal flash Memory IC from its board and start uploading via LPT SPI hardware programmer or USB SPI hardware programmer using the TV/DVD SPI Flash programmer software.
Lastly, of course you have to put back your ST Micro/SGS M25P32 sërïal flash Memory IC to its place again. If you are tired of placing it to its original position you can just soldered using 1ft/12 inches tiny wires for simplicity.
Wednesday, July 30, 2014
Make bootable USB of Windows 7 by Command prompt (CMD)
I have assumed you have a DVD of windows 7 in your tray and a 4 GB Pen drive in one of your USB port. Backup all your pen drive data because it’s going to format.
Now on the command prompt, type the following commands.
Diskpart
List disk
select disk 1 // in my case USB is as disk 1
create partition primary
format fs=ntfs quick // Format Filesystem=NTFS quick(don’t use Quick for deep format, just use format fs=ntfs)
assign
note: drive o: is your usb drive
And Hit the final Enter and you are ready.
Insert your your USB
Go to Start Button then open run and Type cmd.
Now on the command prompt, type the following commands.
Diskpart
List disk
// List disk command will generate the list of Disk connected to your computer like Hard disk and USB disk. This will be like in figure.
After this
select disk 1 // in my case USB is as disk 1
create partition primary
active
format fs=ntfs quick // Format Filesystem=NTFS quick(don’t use Quick for deep format, just use format fs=ntfs)
assign
exit
After this your USB drive is ready to boot any computer just another step requires.
After this, copy all the content of DVD or Windows 7 ISO extract to USB drive.
Done?Now open the command prompt again by typing CMD in run (See more shortcuts)
Now type
o:
Cd o:/boot
Bootsect \nt60 o:note: drive o: is your usb drive
And Hit the final Enter and you are ready.
You can do all the same step there in windows 7 for making a bootable Windows 8 USB. Just use the all files of Windows 8.
Similarly in %usbroot%/Boot
And run the CMD as administrator and similarly select the same directory as in windows 7
i.e. I:/boot/ and type same command in CMD
Type bootsect /nt60 I: //I is your USB drive
And done
Just reboot your computer, enter in BIOS setup and select boot device priority as
* USB
* DVD
* HDD
* Network (Other)
And Tap [F10] to save and Exit.
Again Reboot your system and see setup has been started. Sunday, July 27, 2014
Complete Tutorials for Reconnecting DV235T(MyBro) with PEM and KEY
First you need to open your telnet.
Steps How:
Go to control panel/programs/turn windows feature on or off then select "telnet client"
after enabling telnet
1. go to cmd/command prompt/terminal
2. type telnet 10.X.X.X hit enter
3. login with username: mt7109 password: wimax
4. to get the certificates browse to "etc" folder/dir and to check if it has certificates type "ls"
if you see wmx_client_ca.pem and wmx_priv_key.key there you have it its the certificates
5. now to get the mac address type " sncfg get WAN_MAC " to get the mac address
6. to copy the certificates and mac address right click anywhere on cmd click mark and highlight all
7. then after highlighting hit enter to copy then paste it in notepad
summary :
open cmd
input "telnet + ip address" (where ip address is equal to 10.X.X)
use the login: "mt7109" and password:"wimax" (without " )
input "cd etc"
input "cat wmx_client_ca.pem"
input "catwmx_priv_key.key"
input "sncfg get WAN_MAC"
or download ready to use SCRIPT HERE with Tutorial How to use inside
After getting certificate,key and mac
create a folder for sorting (optional)
copy the contents of "wmx_client_ca.pem" and paste it on any text editor and save it as "anyfilename.pem"
copy the contents of "wmx_priv_key.key" and paste it on any text editor and save it as "anyfilename.key"
and reserve a copy of mac address in a text file
Changing mac and uploading pem and key to device
1. you can use your old change mac address script (with reboot/restart)
2. go to wimax/profile/authentication settings (see the picture below)
3. click browse beside "MTK-Authorized Device Cert. File" and select the ".pem" file
4.click browse beside "Device Private key" and select the ".key" file
5. hit save
How to Hunt SMART MAC
1. download and install angry ip scanner DOWNLOAD HERE
2. go to Tools/Preferences/Ports/port selection input 22,23,80
3. go to Tools/Preferences/Ports&/Display results Tick/check "Host with open ports only"
4. hit OK
5. set the ip rage to "10.0.0.0"
6. set the netmask to "255.0.0.0"
7. leave the hostname blank
8. hit start
After having an iP with open port
1. example the only open port is only port "80" and telnet and ssh are closed
2. add "adv-firewall.html" instead of "index.html"
for example "10.x.x.x/adv-firewal.html/WWW_SID=SIDvalue"
3. go to "Telnet" tab enable telnet
4. hit save
That's all Enjoy Surfing!!! :)
Saturday, July 26, 2014
STEPS HOW TO RECONNECT SMARTBRO CANOPY
I.) Go to Control Panel - Network Connections. Hanapin mo yung connection ng SmartBRO Canopy, normally Local Area Connection.
II.) Once na nahanap mo na, right click the connection and select Properties.
III.) Under sa This connection uses the following items:, double-click yung Internet Protocol TCP/IP.
IV.) Set your IP address to 169.254.3.3, and subnet mask to 255.255.0.0.
V.) Click OK, and close all windows.
VI.) Open your internet browser, we prefer FireFox, and type in 169.254.1.1 sa address bar, this will take you to the Canopy MS.
Note: If this doesn’t work, probably your Canopy MS is blocked, or has been set to use a nonstandard IP address. This is where method two comes in.
STEPS IN SMARTBRO CANOPY HACKING
A1.) Follow steps 1-3 from the first method.
A2.) This time, set your IP address to 10.20.30.40, and subnet mask to 255.0.0.0
The following steps will help you identify your Canopy address, if ever nagbago na ung IP niya (hindi na 169.254.1.1).
A3.) Open the ms-dos command prompt. (on your start menu, select run, and type ‘cmd’)
A4.) Enter the following command: arp -a. It will display IP addresses connected to your network, look for the IP address beginning with 10 (10.xxx.xx.xx), this is your Canopy address. Note that i-disregard niyo lang ung ibang IP addresses, as wala naman tayong pag-gagamitan, and your Canopy address is not the one with 10.0.0.1.
A5.) Close command prompt and open your web browser (use FireFox) and enter your Canopy address sa address bar (10.xxx.xx.xx).
CONGRATS!!!. Napasok mo na yung Canopy page mo without any hassle. May nakausap akong technician once, sabi nila para makuha mo yung exact canopy address mo, akyatin mo lang ang bubong mo tapos tanggalin mo yung antenna, then hanapin mo yung sticker ng canopy , then convert the numbers into hexadecimals to get the IP Address of your canopy.
Now, to maximize your internet capability speed and accuracy , go to the Canopy page – Configuration – Quality of Service QoS. Siguruhin lang na walang values set to 256, if ever meron, then set that to 500.
Also, select Enabled dun sa Hi-Priority Channel.
Kung maganda connection mo, this should take you way beyond your bandwidth capacity, like 500-750kbps. Make sure na jitters is below 5, and di aabot ng 1.5 miles of air distance mo sa base station.
II.) Once na nahanap mo na, right click the connection and select Properties.
III.) Under sa This connection uses the following items:, double-click yung Internet Protocol TCP/IP.
IV.) Set your IP address to 169.254.3.3, and subnet mask to 255.255.0.0.
V.) Click OK, and close all windows.
VI.) Open your internet browser, we prefer FireFox, and type in 169.254.1.1 sa address bar, this will take you to the Canopy MS.
Note: If this doesn’t work, probably your Canopy MS is blocked, or has been set to use a nonstandard IP address. This is where method two comes in.
STEPS IN SMARTBRO CANOPY HACKING
A1.) Follow steps 1-3 from the first method.
A2.) This time, set your IP address to 10.20.30.40, and subnet mask to 255.0.0.0
The following steps will help you identify your Canopy address, if ever nagbago na ung IP niya (hindi na 169.254.1.1).
A3.) Open the ms-dos command prompt. (on your start menu, select run, and type ‘cmd’)
A4.) Enter the following command: arp -a. It will display IP addresses connected to your network, look for the IP address beginning with 10 (10.xxx.xx.xx), this is your Canopy address. Note that i-disregard niyo lang ung ibang IP addresses, as wala naman tayong pag-gagamitan, and your Canopy address is not the one with 10.0.0.1.
A5.) Close command prompt and open your web browser (use FireFox) and enter your Canopy address sa address bar (10.xxx.xx.xx).
CONGRATS!!!. Napasok mo na yung Canopy page mo without any hassle. May nakausap akong technician once, sabi nila para makuha mo yung exact canopy address mo, akyatin mo lang ang bubong mo tapos tanggalin mo yung antenna, then hanapin mo yung sticker ng canopy , then convert the numbers into hexadecimals to get the IP Address of your canopy.
Now, to maximize your internet capability speed and accuracy , go to the Canopy page – Configuration – Quality of Service QoS. Siguruhin lang na walang values set to 256, if ever meron, then set that to 500.
Also, select Enabled dun sa Hi-Priority Channel.
Kung maganda connection mo, this should take you way beyond your bandwidth capacity, like 500-750kbps. Make sure na jitters is below 5, and di aabot ng 1.5 miles of air distance mo sa base station.
Sunday, June 29, 2014
Verify your PAYPAL w/o using any card w/ GCASH AMEX
Ano ang GCASH AMEX?
Virtual card ito ni Globe. Kaya virtual, kasi wala kang physical na card na hahawakan. Para syang credit card na ginawa in partnership sa American Express.
May age limit ba ito?
Yun ang maganda dito. Kahit sino pwedeng mag-apply. Basta may valid ID, mobile phone at Globe SIM.
Magkano naman ibabayad ko?
Wala kang babayaran, as in FREE! Kailangan lang ng 46 PHP na balance sa GCASH AMEX account mo.
Gaano naman katagal?
2-3 days verified kana sa PayPal.
Pano ako mag-aapply?
1) Dial mo *143#, tapos punta ka sa GCASH, tapos Register. Tapos ifill up mo na yung natitirang hinihingi.
2) Yan, may GCASH account kana, Pero hindi pa GCASH AMEX yan. Kulang ka pa ng steps. Ngayon punta ka naman sa Globe store o kaya sa Villarica Pawnshop or sa Tambunting-Antracs para magpa-KYC (Know Your Customer). Wala kang gagawin dito kundi magpapakita ka lang, tapos kailangan may dala kang valid ID. Yun lang yung requirements. Tapos nito KYC ka na. Di ka kasi magkaka-GCASH AMEX pag wala ka nitong step na ito
3) Dial mo ulit *143#, tapos punta ka ulit sa GCASH, tapos punta ka sa GCASH American Express Virtual Pay tapos piliin mo Sign Up. Fill up mo lang din yung natitirang detalye.
4) After mo dito, magkakaroon ka na ng GCASH AMEX! Tignan mo lang yung email address na ginamit mong pangregister para sa virtual card details mo. Kung iOS o Android naman gamit mo, download mo yung GCASH app, libre lang yun. Makikita mo din yung card details mo dun. Or dial mo ulit *143# tapos punta ka sa GCASH American Express Virtual Pay, meron din dun View Details.
5) Ngayon, dito na magsisimula yung verification mo sa PayPal. Login ka na sa PayPal tapos punta ka sa dashboard mo at hanapin mo yung "Get Verified" na link. Click mo yun tapos fill up mo yung hinihinging details. Magchacharge yung PayPal ng refundable verification fee na $2, kaya dapat may balanse yung GCASH AMEX nyo
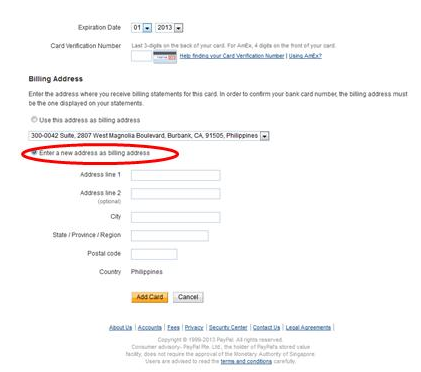
Important: Dito mo na ilalagay yung name mo exactly kung ano yung niregister mo sa GCASH AMEX. Parehong pareho dapat lahat. Tapos sa card type, American Express piliin mo, tapos yung sa card number, yan yung number nung virtual card mo.
Pasok mo rin yung US address na nakuha mo dun sa billing address area ng Add Card sa PayPal:
6) Ngayon, since virtual card lang ang GCASH AMEX, kailangan magpadala ka ng email sa Globe kasi sa kanila mo hihingin yung 4-digit verification code mo sa Paypal. Pag nabigay na nila sayo yun, verified ka na!
Punta ka sa email mo tapos gayahin mo to:
Email Address: gcashinquiries@globe.com.ph
Subject: GCash AMEX – Paypal
Body: Sulat nyo dito na irerequest nyo yung 4-digit verification code nyo sa PayPal tapos isama nyo yung mobile number nyo na ginamit nyong pangregister sa GCASH at yung GCASH AMEX account number nyo
7. After mga 2-3 days, ieemail na kayo ng Globe tapos nandun na yung 4-digit PayPal verification code nyo. Pasok nyo na sa PayPal website.
8. Congrats! Verified na yung PayPal account mo.
Like, Comment and Share lang po if nakatulong, Salamat Enjoy!!!
Virtual card ito ni Globe. Kaya virtual, kasi wala kang physical na card na hahawakan. Para syang credit card na ginawa in partnership sa American Express.
May age limit ba ito?
Yun ang maganda dito. Kahit sino pwedeng mag-apply. Basta may valid ID, mobile phone at Globe SIM.
Magkano naman ibabayad ko?
Wala kang babayaran, as in FREE! Kailangan lang ng 46 PHP na balance sa GCASH AMEX account mo.
Gaano naman katagal?
2-3 days verified kana sa PayPal.
Pano ako mag-aapply?
1) Dial mo *143#, tapos punta ka sa GCASH, tapos Register. Tapos ifill up mo na yung natitirang hinihingi.
2) Yan, may GCASH account kana, Pero hindi pa GCASH AMEX yan. Kulang ka pa ng steps. Ngayon punta ka naman sa Globe store o kaya sa Villarica Pawnshop or sa Tambunting-Antracs para magpa-KYC (Know Your Customer). Wala kang gagawin dito kundi magpapakita ka lang, tapos kailangan may dala kang valid ID. Yun lang yung requirements. Tapos nito KYC ka na. Di ka kasi magkaka-GCASH AMEX pag wala ka nitong step na ito
3) Dial mo ulit *143#, tapos punta ka ulit sa GCASH, tapos punta ka sa GCASH American Express Virtual Pay tapos piliin mo Sign Up. Fill up mo lang din yung natitirang detalye.
4) After mo dito, magkakaroon ka na ng GCASH AMEX! Tignan mo lang yung email address na ginamit mong pangregister para sa virtual card details mo. Kung iOS o Android naman gamit mo, download mo yung GCASH app, libre lang yun. Makikita mo din yung card details mo dun. Or dial mo ulit *143# tapos punta ka sa GCASH American Express Virtual Pay, meron din dun View Details.
5) Ngayon, dito na magsisimula yung verification mo sa PayPal. Login ka na sa PayPal tapos punta ka sa dashboard mo at hanapin mo yung "Get Verified" na link. Click mo yun tapos fill up mo yung hinihinging details. Magchacharge yung PayPal ng refundable verification fee na $2, kaya dapat may balanse yung GCASH AMEX nyo
Important: Dito mo na ilalagay yung name mo exactly kung ano yung niregister mo sa GCASH AMEX. Parehong pareho dapat lahat. Tapos sa card type, American Express piliin mo, tapos yung sa card number, yan yung number nung virtual card mo.
Pasok mo rin yung US address na nakuha mo dun sa billing address area ng Add Card sa PayPal:
6) Ngayon, since virtual card lang ang GCASH AMEX, kailangan magpadala ka ng email sa Globe kasi sa kanila mo hihingin yung 4-digit verification code mo sa Paypal. Pag nabigay na nila sayo yun, verified ka na!
Punta ka sa email mo tapos gayahin mo to:
Email Address: gcashinquiries@globe.com.ph
Subject: GCash AMEX – Paypal
Body: Sulat nyo dito na irerequest nyo yung 4-digit verification code nyo sa PayPal tapos isama nyo yung mobile number nyo na ginamit nyong pangregister sa GCASH at yung GCASH AMEX account number nyo
7. After mga 2-3 days, ieemail na kayo ng Globe tapos nandun na yung 4-digit PayPal verification code nyo. Pasok nyo na sa PayPal website.
8. Congrats! Verified na yung PayPal account mo.
Like, Comment and Share lang po if nakatulong, Salamat Enjoy!!!
Sunday, June 22, 2014
How do I enable Java in my web browser?
This article applies to:
Platform(s): Windows 7, Vista, Windows XP, Windows 2000, Windows 2003, Macintosh OS X
SYMPTOMS
Even after installing Java, Applets do not run.
CAUSE
Java is not enabled in the web browser. If Java is already installed but applets do not work, you need to enable Java through your web browser.
SOLUTION
If you recently installed Java, you may need to restart your browser (close all browser windows and re-open), in order for the browser to recognize the installation. In addition, make sure Java content in the browser is enabled through the Java Control Panel.
Follow these instructions to enable Java though your Web browser.
Browsers for Windows
Internet Explorer
Click Tools and then Internet Options
Select the Security tab, and select the Custom Level button
Scroll down to Scripting of Java applets
Make sure the Enable radio button is checked
Click OK to save your preference
Chrome
Enter about:plugins in the search field.
In the Plug-ins list, look for Java and check whether Java is enabled (if the Disable link appears, Java is already enabled)
Click on the Enable link (if available)
(Optional) Check the Always allowed box to stop additional Chrome warnings when running Java content
Browsers for Windows and Mac OS X
Firefox
Open the Firefox browser or restart it, if it is already running
From the Firefox menu, select Tools, then click the Add-ons option
In the Add-ons Manager window, select Plugins
Click Java (TM) Platform plugin to select it
Click on the Enable button (if the button says Disable, Java is already enabled)
Safari
Click on Safari and select Preferences
Choose the Security option
Select Allow Plug-ins, then click on Manage Website Settings
Click on the Java item, select an option (Ask, Allow or Allow Always) from the pulldown list When visiting other websites
Click Done, then close the Safari Preferences window
Opera 4.x and Up
Opera for Windows does not use Java, but an embedded version already inside the Opera Web browser.
Opera for other platforms may supports Java . Please consult your Opera platform documentation.
For further information, please review the following Opera Support article:
Support for Java software in Opera
Friday, June 20, 2014
How to Flash/Upgrade Lenovo A369i with Stock Firmware
Here's how:
- First, you need to download a stock firmware Lenovo A369i_ROW_S108_130929.
- That RAR file will contain 3 folders - namely: Lenovo A369i_ driver file, Lenovo A369i_Software Upgrate Tool and Target_bin. Extract all of them in a convenient directory to work on.
- The first thing we need to work on is the drivers for the phone. We will install it first before everything else. To install it, REMOVE BATTERY of phone.
- Open Device Manager.
- Expand Ports (COM & LPT)
- Plug in USB cable. And quickly look for a device which has a name of Preloader that will be installing, but Windows could not find its driver.
- For just... like 3 seconds from the moment you plug in USB cable to the phone, it will be gone. So, you need to be fast. Before it will be gone, right click it and click Update Driver. Choose manually install driver and point it to the directory folder Lenovo A369i_ driver file. Now, you will have MediaTek Preloader USB VCOM Port.
- Next is the Software Upgrade Tool. Open the folder Lenovo A369i_Software Upgrate Tool and run Flash_tool.exe
- Click File -> Open Scatter-loading File... -> browse to the folder Target_bin and click the file MT6572_Android_scatter.txt
- Check the box DA DL All With Check..
- Unplug USB cable.
- Plug it again and after 1.5 sec (you need to be fast), click Download.
- If you did it right it will start downloading files into phone. This will let us avoid future errors like error in partition in SDCARD. Wait for the GREEN CIRCLE to pop out.
- 14. After that, uncheck the box DA DL All With Check.
- Unplug USB cable, then plug it again, for 1.5 sec click Firmware -> Upgrade button.
- Wait for it, it will take time. Even if it shows 0% it is still working its magic. You just need to wait for the GREEN CIRCLE to pop out.
- After that, unplug USB cable.
- Put battery on.
- Turn on phone.
- Wait for it, and BOOM!!!
I will not be responsible however if you brick your phone.
Monday, August 12, 2013
Candy Crush Saga all boosters, lives, etc.
999999999 Lives
999999999 Lollipop Hammer
Charm Of Life Unlocked And Purchased
Charm Of Stripes Unlocked And Purchased
Charm Of Frozen Time Unlocked And
Purchased
Unlocked & purchased Striped & Wrapped
Booster
Unlocked and Purchased Lucky Candy
Booster and Color Bomb
Unlocked and purchased Jelly Fish Booster
All boost unlimited
make sure your candy crash application is close.
Step 1: Go to apps>info and force close.
Step 2: Download the attachment below.
Step 3: Open the RE(root exp)
Step 4: Go to /data/data/
com.king.candycrushsaga/app_storage
delete the save_XXXXXX.bak and
copy or replace the save_0.dat that you have downloaded below.
Step 5: Press and Hold save_0.dat find permissions then check first and second column. Enjoy !!!
DOWNLOAD
Monday, July 15, 2013
Easy Way How to Make Money Online
Before we Start
You will Have To Sign-Up For Payment Processor HERE
You will need Payment Processors in order to get payment of your earnings
There is no any charge to make account on payment processors.
Now You Have So Many Ways to make Money Online.
Types of Online Earning.
PTC - Paid To Click These sites allow you to earn by clicking on sites and wait for the timer to end before going on to next site. It is an effortless way of earning and only takes up a small amount of your time.
Earnings: Low [Cents]
Difficulty: Easy
Bot-able?: Yes
GPT - Get Paid To These sites allow you to earn mainly by completing tasks, watching videos and doing offers. It has a wide variety of options to earn, and different GPT sites have varying areas ( Some has paid to search.
Earnings: High [Dollars]
Difficulty: Average
Bot-able?: No
PTP - Paid To Promote These sites allow you to earn by promoting their contents. It can be a promotion of links leading to advertisement, or banners showing advertisements. Most earnings are calculated based on CPM ( impressions ) with the exception of some.
Earnings: Low [Cents]
Difficulty: Average
Bot-able?: Yes
PTR - Paid To Read These sites allow you to earn by reading mails and clicking ads. It is very similar to PTC sites but with more focus on mails. Mails usually appear throughout the day so there is no limit to the earnings.
Earnings: Low [Cents]
Difficulty: Easy
Bot-able?: Yes
PTS - Paid To Surf These sites allow you to earn by surfing sites, also called traffic exchange. There are basically two types of surf, manualsurf & autosurf. Manualsurf requires you to type in captchas and have cheat checks. Most paid autosurf are scams with few exceptions, which pay very little.
Earnings: Low [Cents]
Difficulty: Easy
Bot-able?: Yes
PTSU - Paid To Sign Up These sites allow you to earn by signing up as referrals for the advertiser. It is easy & quick, however it is rare to find one that really pays. A standalone PTSU is even rarer.
Earnings: Medium [Cents++]
Difficulty: Easy
Bot-able?: No
HYIP - High Yield Investment Programs These sites allow you to earn by investing a certain amount of money into it, then ask you to do a minimum requirement in order to earn. At the end of the cycle, you will receive a higher % of money than what is invested.
Earnings: High [~]
Difficulty: ? (Risky)
Bot-able?: NO
PTW - Paid To Write These sites allow yout o earn by writing contents and posting it on their sites. The contents vary from articles to pictures or other forms. These are two types of PTW. One pays you upon approved article, which is a one time payment. The other pays you based on the number of views to your contents, which could be cpm or cpc and make it long term earning, provided your content is still there.
Earnings: Medium (CPm based)/High (Upfront payment) [Cents/Dollars]
Difficulty: High
Bot-able?: Yes
You will Have To Sign-Up For Payment Processor HERE
You will need Payment Processors in order to get payment of your earnings
There is no any charge to make account on payment processors.
Now You Have So Many Ways to make Money Online.
Types of Online Earning.
PTC - Paid To Click These sites allow you to earn by clicking on sites and wait for the timer to end before going on to next site. It is an effortless way of earning and only takes up a small amount of your time.
Earnings: Low [Cents]
Difficulty: Easy
Bot-able?: Yes
GPT - Get Paid To These sites allow you to earn mainly by completing tasks, watching videos and doing offers. It has a wide variety of options to earn, and different GPT sites have varying areas ( Some has paid to search.
Earnings: High [Dollars]
Difficulty: Average
Bot-able?: No
PTP - Paid To Promote These sites allow you to earn by promoting their contents. It can be a promotion of links leading to advertisement, or banners showing advertisements. Most earnings are calculated based on CPM ( impressions ) with the exception of some.
Earnings: Low [Cents]
Difficulty: Average
Bot-able?: Yes
PTR - Paid To Read These sites allow you to earn by reading mails and clicking ads. It is very similar to PTC sites but with more focus on mails. Mails usually appear throughout the day so there is no limit to the earnings.
Earnings: Low [Cents]
Difficulty: Easy
Bot-able?: Yes
PTS - Paid To Surf These sites allow you to earn by surfing sites, also called traffic exchange. There are basically two types of surf, manualsurf & autosurf. Manualsurf requires you to type in captchas and have cheat checks. Most paid autosurf are scams with few exceptions, which pay very little.
Earnings: Low [Cents]
Difficulty: Easy
Bot-able?: Yes
PTSU - Paid To Sign Up These sites allow you to earn by signing up as referrals for the advertiser. It is easy & quick, however it is rare to find one that really pays. A standalone PTSU is even rarer.
Earnings: Medium [Cents++]
Difficulty: Easy
Bot-able?: No
HYIP - High Yield Investment Programs These sites allow you to earn by investing a certain amount of money into it, then ask you to do a minimum requirement in order to earn. At the end of the cycle, you will receive a higher % of money than what is invested.
Earnings: High [~]
Difficulty: ? (Risky)
Bot-able?: NO
PTW - Paid To Write These sites allow yout o earn by writing contents and posting it on their sites. The contents vary from articles to pictures or other forms. These are two types of PTW. One pays you upon approved article, which is a one time payment. The other pays you based on the number of views to your contents, which could be cpm or cpc and make it long term earning, provided your content is still there.
Earnings: Medium (CPm based)/High (Upfront payment) [Cents/Dollars]
Difficulty: High
Bot-able?: Yes
Thursday, July 11, 2013
Probux FAQ
Frequently Asked Questions | |||||||||||||||||||||||||||||||||||||||||||||||||||||||||||||||||||||||||||||||||||||||||||||||||||||||||||||||||||
What is ProBux? So, what are you waiting for? Start earning money now! How can I start earning? After this you should click on the advertiser's advertisement on View Ads page and view it during the amount of time specified by the advertiser. After viewing the advertisement, you gets credited with a pre-determined amount of money in their ProBux account. The amount of money each user earns varies between the user's membership, the type and quantity of advertisements the user has viewed, the number of referrals the user has and the number of advertisements those referrals view.
The amount we pay you depends on a few different factors. Let's describe the amount you earn per click and for each of your referral's clicks depending on the type of upgrade you have and the type of the exposed ad:
Referrals are users like you who have registered in ProBux. There are two types of referrals: · Direct Referrals: These users registered using your username as their referrer. · Rented Referrals: These users registered without a referrer. You can rent them. Rented Referrals: The quantity of referrals available will vary depending on how many users registered without a referrer. The rental price for each referral per month is:
Is your referral inactive or just clicks a few advertisements per day? No problem. For just $0.07 you can replace him/her with a new active referral. How can I cashout the money? In your ProBux account you can click the option "Cashout" and withdraw the money you have earned.AutoPay is one way to extend your referrals automatically. If you have AutoPay enabled, on the first click a referral makes per day, you'll pay to keep that referral for an extra day. If the referral does not click, you won't pay him for another day. In other words, you'll pay one day in advance to your referral's due date. AutoPay is also cheaper for you because you save 15% of a whole month's rent. The value for each referral/day will be deducted from your rental balance. If your rental balance has insufficient funds, it will deduct from your main balance. If both balances have insufficient funds, it won't be triggered and will only work again when one of the balances has enough funds. Note: Please keep in mind that while you may have AutoPay activated, it's only triggered for referrals that have 20 or more days left until the next payment. Can other people in my household join? No, only one user is allowed per household. Unless you have two different internet connections.Don't login at school, work or by using some kind of Proxy or VPN because usually the IP is the same for every Internet user and the computers may be accessed by other accounts. | |||||||||||||||||||||||||||||||||||||||||||||||||||||||||||||||||||||||||||||||||||||||||||||||||||||||||||||||||||
Monday, July 8, 2013
Probux Strategy
A beginner's guide to earning $2000+ per month with Probux
This guide is for Probux members.
If you are not a Probux Member please click this banner
Sign-Up then come back to learn how to earn with Probux!.
Introduction
Probux is a promising PTC site, and it is similar to other programs such as Neobux, but with a different payout structure. As with all money making opportunities, nothing can really be guaranteed, since you will earn depending on what effort you put into it. Probux offers a way to earn real money each day, and can even become a supplement to your income with as little as 10 minutes per day.
Part 1: Getting Started
If you have not already signed up for Probux, click on any of the Probux banners within the guide or
Sign-Up here
Sign-Up here
What is Probux?
Probux is a PTC (Paid To Click) service where members earn a small amount of money for viewing ads. It is 100% legitimate and Probux is possibly one of the most promising PTC sites. Advertisers on Probux are fully aware that members are being paid to view the ads, so it is a fair system to all.
How do I earn money with Probux?
There are three basic streams of income from Probux:
- Income from your personal actions on the site (viewing ads, doing mini-jobs, etc)
- Commissions paid to you from RRs (Rented Referrals) - explained later in Part 3.
- Commissions paid to you from DRs (Direct Referrals) - explained later in Part 4.
How much money can I make?
If you are willing to put a small amount of time each day, and you follow this guide, you should be able to make well over $1,000 per month spending less than 10 minutes each day. Some users make several thousand dollars per month with the same time commitment. It will not happen overnight, but with some diligence, this is certainly an achievable goal already reached by many of the Probux veterans.
How do I get started?
If you have not already signed up for Probux, click on any of the Probux banners within the guide or Sign-UP here
NOTE: There is only a very slim chance that I (the author of this Probux strategy guide) will get you as a Direct Referral.
This Probux strategy guide is not only educational, but also a tool I developed to help all Probux users get FREE Probux Direct Referrals. You will be able to participate as well, as I will explain later in Part 4.
Something to think about... if you have 200 DRs but they are uneducated about Probux and quit, you won't make money from them! My goal is to help you acquire ACTIVE Probux referrals so that you make more money. Typically, educated referrals are active referrals!
After you have signed up, continue to Part 2.
Part 2: The First Two Weeks
In my opinion, the first two weeks are "make it or break it" with Probux users. Sadly, a lack of education will cause many to leave, but you are in the right place to avoid missing out on this great opportunity.
- Getting into the daily routine of viewing the ads assigned to you
- Earning your first $0.60 so you can begin the referral rental process
TIP: View ads by logging in and clicking the "View Advertisements" button at the top of your page.
You are not going to earn much during the first two weeks,
15 days * approx. $0.04 / day = $0.60 ... Trivial as it may seem, $0.60 is your 1st goal.
Goal #1 - Earn $0.60
TIP:If you are able to complete Task(mini job), you can reach Goal #1 within a day or two!
You are not going to earn much during the first two weeks,
15 days * approx. $0.04 / day = $0.60 ... Trivial as it may seem, $0.60 is your 1st goal.
Goal #1 - Earn $0.60
TIP:If you are able to complete Task(mini job), you can reach Goal #1 within a day or two!
If you are interested in a small jump start and have even just a few dollars to invest into your new Probux business, there are instructions in Part #3.
1. If you don't want to do Tasks it's okay will ADS clicking.
2. Click Ads Everyday until you to gain $0.60 in your account.
3.Once you have at least $0.60 in your Probux account, you have enough to rent 3 referrals. As mentioned above, you can "jump start" your business by investing a few dollars of your own and begin renting Probux referrals sooner.
4. Earn Another $0.60 in your account you will earn it still by clicking ads everyday for you to have the credits of your rented referrals click.
Note. You will not earn from your rented referrals if you don't click so you need to click everyday.
5. Use again your second $0.60 earning to another set of referrals you should end up having 6 rented referrals this time your earnings will be around $0.10 to $0.11+ per day.
6. Earn your 3rd $0.60 for you to buy another set of referrals.
Note. You need 7 days gap period on renting referrals again so you need to wait by that time you have the required amount.
7. At last rent your 3rd set of referrals using what you earned you feel that its a lot more faster now to earn.
Note. You will need to do this again and again until you reach the limitation of 200 RR for Standard Accounts. You can Rent Other Set if you have the amount Needed..
This are the following Set and their price.
Note. You will need to do this again and again until you reach the limitation of 200 RR for Standard Accounts. You can Rent Other Set if you have the amount Needed..
This are the following Set and their price.
Quote:
3 RR = $0.60
10 RR = $2.00
25 RR = $5.00
50 RR = $10.00
100 RR = $20.00
10 RR = $2.00
25 RR = $5.00
50 RR = $10.00
100 RR = $20.00
Note. You need to save earnings for you to renew all your Rented referrals and for recycling them up if needed..
8. Earning is a lot more faster now so try to earn more for renting again and for maintaining your Rented Referrals.
If you want to Renew your referrals You can Activate its Autopay Features or if you want save here's some List of Prices Regarding of Renewing your RR.
30 days = 0.20 Per RR
60 days = 0.36 Per RR 10% discount
90 days = 0.48 per RR 20% discount
150 days = 0.75 per RR 25% discount
240 days = 1.12 pe RR 30% discount
You must renew your RR 5 days before it ends if you are going to renew them manually.
And it depends on how many days you want.
If you want to Renew your referrals You can Activate its Autopay Features or if you want save here's some List of Prices Regarding of Renewing your RR.
30 days = 0.20 Per RR
60 days = 0.36 Per RR 10% discount
90 days = 0.48 per RR 20% discount
150 days = 0.75 per RR 25% discount
240 days = 1.12 pe RR 30% discount
You must renew your RR 5 days before it ends if you are going to renew them manually.
And it depends on how many days you want.
Part 3: Renting Your First Referrals
Congratulations!!! It's a big deal to make it through the first 15 days. A lot of people quit before this point... and guess what, this is where the fun begins!You're gonna do just fine!
Before you do, read this:
Goal #2
- Rent 3 referrals by clicking the "Referrals" button on your account homepage.
Goal #3
- Turn on "Auto Pay" within the Referrals>Rented Menu.
I prefer Autopay = Enabled because each day your referrals are active, they pay for themselves to be extended. This way, you do not need to worry about how much money to reserve for re-rental. Autopay is a must!
TIP: There is a discount applied when using Autopay as well, yet another good reason to use it!
Assuming your 3 rented referrals stay active, you will earn the following:
3 RR x 4 CLICKS at $0.005 each = $0.06 / day
Clicking ads assigned to you, still approx $0.04 / day
For a total of $0.10 / day.
TIP: There is a discount applied when using Autopay as well, yet another good reason to use it!
Assuming your 3 rented referrals stay active, you will earn the following:
3 RR x 4 CLICKS at $0.005 each = $0.06 / day
Clicking ads assigned to you, still approx $0.04 / day
For a total of $0.10 / day.
- Within one more week you can rent 3 more referrals, and be earning $0.16 / day
- The following week you will have enough to rent 5 more referrals (now you will have 11 RRs) for a total of $0.26 / day.
- The week after that, you will have enough to rent 10 more referrals (now you will have 21 RRs) for a total of $0.46 / day.
- At the end of the 4th week from when you rented your first RRs, you will have enough to rent 19 more referrals (now you will have 40 RRs) for a total of $0.84 / day.
- And so on...
Continue viewing your assigned advertisements each day so that you can earn your rented referral income, and when you save up enough money to rent more referrals, get them! The more rented referrals you have, the more you will make. I recommend choosing a day of the week for rentals, and on that day rent as many as the funds in your Probux account can afford.
Goal #4
Goal #4
- Continue until acquire 200 rented referrals
Yes, It will take some time, but remember, you are building a business and passive income with just a small time commitment each day! It goes pretty fast since renting referrals increases your income, and increased income allows you to rent more referrals. Can you say "snowball effect?"
TIP: 200 RRs * 4 RR-clicks at $0.005 per click = $4/day ... It will take about three weeks to save up $80 for Part 5.
Once you have 200 referrals, stop renting and save up $80 in your Probux account.
TIP: 200 RRs * 4 RR-clicks at $0.005 per click = $4/day ... It will take about three weeks to save up $80 for Part 5.
Once you have 200 referrals, stop renting and save up $80 in your Probux account.
I will explain this more in Part 5.
Part 4: Where to Get your DR(Direct Referrals)
There are many ways to acquire DRs... YouTube, Facebook, word of mouth, forum signatures, AdWords, and a list of places towards the end of the guide! These are all valid and I encourage you to use any marketing skills that you have to promote your Probux business.
Part 5: "Go for Gold!"
Now that you have 200 referrals, stop renting and save up $80 so that you can upgrade to Golden. Once you go Gold, you will double up your income nearly instantly since the payouts are 2x - 10x for your clicks and referral clicks!
Goal #5 - Upgrade your account to Gold
Here is your income before Golden:
200 RR * 4 RR-clicks at $0.005 per click = $4.00 per day (plus DR-clicks and your personal clicks)
Here is your income after you go Golden:
200 RR * 4 RR-clicks at $0.01 per click = $8.00 per day (plus DR-clicks and your personal clicks)
Once you've gone golden, begin renting referrals again. It's tempting to cash out, but you really want to get to the maximum number of RRs and DRs so that you earn as much as possible.
Goal #6 - Build your RRs to 2000.
Resume your rental process and acquire 2,000 RRs. This will not take too terribly long since by now you should be earning over $200 per month.
2000 RRs * 4 RR-clicks at $0.01 per RR-click = $80/DAY (plus your DR-clicks and your personal clicks!).
TIP: When you go Golden, you will have to view 9 ads per day instead of 4!
TIP: Check out some of the "Golden Packs" to gain more benefits from being Golden.
At this point you are a true Golden Child of Probux! Once you have saved enough to buy golden packs, do it so you can rent more RRs and gain more benefits. By now, you will already be laughing all the way to the bank so enjoy your new side job!
Final Thoughts
Math is math, not magic.
Mathematically speaking, the formulas used by Probux are set up for you to be successful, if you are committed to your own success. It is not difficult, but it takes diligence. Math does not lie, and it is not magic. The numbers speak for themselves.
Promises and Guarantees.
Life is full of people who will say anything to get what they want. Watch out for those people! Probux is not a get rich quick program, but you can certainly earn significant additional income if treated like a job/business. The examples used in this guide are accurate, however you should understand that not all of your RRs will give you 4 clicks everyday... some will give more, some will give less. So in that sense, the examples are accurate, but your experience will vary a little. Obviously I cannot promise you wealth, but I can guarantee that you will earn money with Probux if you follow this guide!
To recycle or not to recycle?
Recycling inactive RRs is an option, but personally I feel the manual recycling is not cost efficient early on when the system auto-recycles for free. Read the resources section below for more info on various opinions and decide for yourself. Once you have an established income, manual recycling may be beneficial.
Mathematically speaking, the formulas used by Probux are set up for you to be successful, if you are committed to your own success. It is not difficult, but it takes diligence. Math does not lie, and it is not magic. The numbers speak for themselves.
Promises and Guarantees.
Life is full of people who will say anything to get what they want. Watch out for those people! Probux is not a get rich quick program, but you can certainly earn significant additional income if treated like a job/business. The examples used in this guide are accurate, however you should understand that not all of your RRs will give you 4 clicks everyday... some will give more, some will give less. So in that sense, the examples are accurate, but your experience will vary a little. Obviously I cannot promise you wealth, but I can guarantee that you will earn money with Probux if you follow this guide!
To recycle or not to recycle?
Recycling inactive RRs is an option, but personally I feel the manual recycling is not cost efficient early on when the system auto-recycles for free. Read the resources section below for more info on various opinions and decide for yourself. Once you have an established income, manual recycling may be beneficial.
Subscribe to:
Posts (Atom)


.jpg)
.png)